Tuesday, May 2, 2023

cara set sinkronisasi waktu di windows server 2003 dan 2008

https://timetoolsltd.com/time-sync/how-to-synchronize-microsoft-windows-to-a-ntp-server/ 

Microsoft Windows Server 2008, Server 2003

To configure a Windows PDC to synchronize with an external NTP server requires registry entry changes. When modifying registry settings, it is always a good idea to backup the current settings beforehand. Backup and modification of the registry is easily achieved using the ‘regedit’ utility, which can be run from the command line. You can revert back to previous settings if any problems occur with registry changes. Use the registry editor ‘regedit’ to change the following entries:

1. Change the server type to NTP.
Registry Key: HKEY_LOCAL_MACHINE\SYSTEM\CurrentControlSet\Services\W32Time\Parameters\Type
Change value data to: NTP

2. Set announce flags.
Registry Key:
HKEY_LOCAL_MACHINE\SYSTEM\CurrentControlSet\Services\W32Time\Config\AnnounceFlags
Change value data to: 5

3. Enable NTP server
Registry Key:
HKEY_LOCAL_MACHINE\SYSTEM\CurrentControlSet\Services\W32Time\TimeProviders\NtpServer
Change value data to: 1.

4. Specify the time sources.
Registry Key:
HKEY_LOCAL_MACHINE\SYSTEM\CurrentControlSet\Services\W32Time\Parameters
Change value data to: <peerlist>
<peerlist> is a list of space-delimited NTP peers from which time can be received. If DNS names are used, you must append ‘,0x1’ to each DNS name. Alternatively, a list of IP addresses can be specified.

5. Select poll interval.
Registry Key:
HKEY_LOCAL_MACHINE\SYSTEM\CurrentControlSet\Services\W32Time\TimeProviders\NtpClient\SpecialPollInterval
Change value data to: <period>
<period> is the time in seconds between each poll. Microsoft recommends a value of 900, which equates to a polling frequency of once every 15 minutes.

6. Set the time correction settings.
These settings specify a time frame to validate time stamps received from an external reference. Only if the received timestamp falls between these registry settings will they be accepted. It provides a facility to reject timestamps that are too far away from the hosts system time. Microsoft recommends a setting of 1 hour (3600) or 30 minutes (1800).
Registry Key:
HKEY_LOCAL_MACHINE\SYSTEM\CurrentControlSet\Services\W32Time\Config\MaxPosPhaseCorrection
Change value data to: <seconds>
Where <seconds> is the maximum positive offset of the received time stamp from the system time.

Registry Key:
HKEY_LOCAL_MACHINE\SYSTEM\CurrentControlSet\Services\W32Time\Config\MaxNegPhaseCorrection
Change value data to: <seconds>
Where <seconds> is the maximum negative offset of the received time stamp from the system time.

7. Restart the windows time service.
Stop and restart the Windows Time Service using the ‘net stop’ and ‘net start’ commands:
net stop w32time && net start w32time
Synchronizing a Windows Workgroup

Tuesday, March 14, 2023

Problem This share requires the obsolete SMB1 protocol di windows 10

 aktifkan fitur lewat setelan aplikasi windows:

SMB 1.0/CIFS File Sharing Support Option

Merubah network category pada windows 10 menjadi domain, private atau public

 Cari network yang ingin dirubah di :
 HKEY_LOCAL_MACHINE\SOFTWARE\Microsoft\Windows NT\CurrentVersion\NetworkList\Profiles

Cari profilename yang ingin dirubah, Lalu rubah nilai category berdasar nilai berikut:


Network LocationData Value
Public0 (zero)
Private1
Domain2

caranya itu, tapi nggak kelihatan efeknya

 10

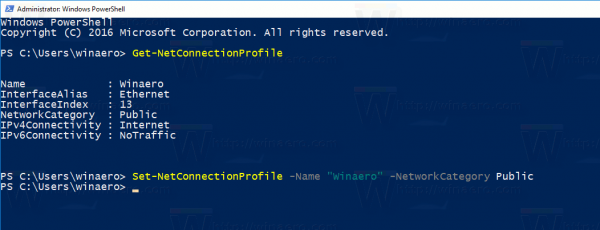
  1. Open PowerShell as Administrator.
  2. Type or copy-paste the following command:
    Get-NetConnectionProfile
  3. In the command output, see the line "Name". It contains the name of your network which you need to use with the next command.
  4. To set the network location type to Public, type or copy paste the following command:
    Set-NetConnectionProfile -Name "Your Network Name" -NetworkCategory Public

    Replace the "Your Network Name" with your actual network name you got from the previous command.Set Network Type With PowerShell


Monday, February 27, 2023

instalasi / migrasi server email dengan Ubuntu 12.04 LTS, postfix dovecot, squirrelmail

 Set network ke yang bisa internetan.

Setel /etc/apt/sources.list agar bisa update, misal ke alamat old-releases.ubuntu.com. untuk ubuntu 12.04:

deb http://old-releases.ubuntu.com/ubuntu/ precise main restricted multiverse universe

deb http://old-releases.ubuntu.com/ubuntu/ precise-updates main restricted multiverse universe

jalankan satu satu :

apt-get update

apt-get upgrade

apt-get install ssh apache2 php5

apt-get install postfix 

Perhatikan setelan dari /etc/postfix/main.cf terutama untuk (asumsi nama domain adalah bagus.com), dengan network lokalnya 192.168.xxx.xxx:

mydomain = bagus.com

myhostname = mail.bagus.com

myorigin = bagus.com

alias_maps = hash:/etc/aliases

alias_database = hash:/etc/aliases

mydestination = localhost, bagus.com

mynetworks = 127.0.0.0/8, 192.168.0.0/16

smtpd_sasl_exceptions_networks = $mynetworks

relay_domains = $mydestination

header_checks = regexp:/etc/postfix/header_checks


file /etc/postfix/header_checks contoh isinya:
/^Subject: .*been hacked/ DISCARD 550 User unknown
/^From: .*SureVoIP/ DISCARD 550 User unknown

Lalu jalankan untuk dovecot
apt-get install dovecot-core dovecot-imapd dovecot-pop3d
dil file /etc/dovecot/conf.d/10-auth.conf kalau tidak ingin pakai TLS:
disable_plaintext_auth = no
auth_mechanisms = plain login
di file /etc/dovecot/conf.d/10-master.conf, hilangkan # di contohnya IMAPS:
inet_listener imaps {
    #port = 993
    #ssl = yes
  }


di file /etc/dovecot/conf.d/10-mail.conf boleh pakai:

mail_location = mbox:~/mail:INBOX=/var/mail/%u


Jalankan perintah 

squirrelmail-configure

Terutama untuk bagian server, pilih model dovecot untuk IMAP servernya. Lalu jalankan:

cp /etc/squirrelmail/apache.conf /etc/apache2/sites-available/squirrelmail.conf

a2ensite squirrelmail.conf

service apache2 reload

Jalankan squirrelmail lewat http://alamatnya/squirrelmail

Kalau misal migrasi, bisa copykan isi /etc/passwd dan /etc/shadow ke komputer yang baru, tapi editnya pakai vi . 

Karena user baru nggak ada home, maka setel:

chmod 777 /home

chmod 777 /var/mail


kalau untuk forward port dari luar bisa pakai /etc/iptables.rules

# Generated by iptables-save v1.3.3 on Fri Nov 15 13:32:49 2013

*nat

:PREROUTING ACCEPT [428:47001]

:POSTROUTING ACCEPT [5:559]

:OUTPUT ACCEPT [5:559]

-A PREROUTING -i eth1 -p tcp -m tcp --dport 1110 -j REDIRECT --to-ports 110

-A PREROUTING -i eth1 -p tcp -m tcp --dport 3310 -j REDIRECT --to-ports 110

-A PREROUTING -i eth1:1 -p tcp -m tcp --dport 1110 -j REDIRECT --to-ports 110

-A PREROUTING -i eth1:1 -p tcp -m tcp --dport 3110 -j REDIRECT --to-ports 110

-A INPUT -s 80.94.95.204 -j DROP

-A INPUT -s 176.111.173.25 -j DROP

COMMIT

# Completed on Fri Nov 15 13:32:49 2013


Sumber:
https://www.alibabacloud.com/blog/how-to-setup-email-server-with-postfix%2C-dovecot%2C-directmail-and-squirrelmail-on-ubuntu-16-04-alibaba-ecs_594092


Thursday, February 23, 2023

Install applikasi yang bisa membuat Windows 10 lebih enteng, winutil / win debloater

Jalankan perintah berikut di powershellnya windows di mode administrator

iwr -useb https://christitus.com/win | iex

Atau:

irm christitus.com/win | iex

Kalau gagal di atas:

[Net.ServicePointManager]::SecurityProtocol=[Net.SecurityProtocolType]::Tls12;iex(New-Object Net.WebClient).DownloadString('https://raw.githubusercontent.com/ChrisTitusTech/winutil/main/winutil.ps1')


Kalau misal ada error

Set-ExecutionPolicy Unrestricted -Scope Process -Force

Saturday, September 17, 2022

cara defrag paksa SSD, fragmentasi terlalu parah bisa membuat windows errror

 Ada info di

https://www.hanselman.com/blog/the-real-and-complete-story-does-windows-defragment-your-ssd

Bahwa fragmentasi harddisk harus dibatasi untuk mencegah error:

Actually Scott and Vadim are both wrong. Storage Optimizer will defrag an SSD once a month if volume snapshots are enabled. This is by design and necessary due to slow volsnap copy on write performance on fragmented SSD volumes. It’s also somewhat of a misconception that fragmentation is not a problem on SSDs. If an SSD gets too fragmented you can hit maximum file fragmentation (when the metadata can’t represent any more file fragments) which will result in errors when you try to write/extend a file. Furthermore, more file fragments means more metadata to process while reading/writing a file, which can lead to slower performance.

As far as Retrim is concerned, this command should run on the schedule specified in the dfrgui UI. Retrim is necessary because of the way TRIM is processed in the file systems. Due to the varying performance of hardware responding to TRIM, TRIM is processed asynchronously by the file system. When a file is deleted or space is otherwise freed, the file system queues the trim request to be processed. To limit the peek resource usage this queue may only grow to a maximum number of trim requests. If the queue is of max size, incoming TRIM requests may be dropped. This is okay because we will periodically come through and do a Retrim with Storage Optimizer. The Retrim is done at a granularity that should avoid hitting the maximum TRIM request queue size where TRIMs are dropped.


Disebut windows secara otomatis akan mencegah ini bila volume shadow copy atau system restore aktif. Sayangnya banyak program defrag sekarang yang menolak defrag SSD. Solusinya adalah pakai program defrag lama yang belum support SSD.


Cara lain adalah dengan menggunakan smart defrag, dan setelah dijalankan pertama, edit file berikut:

C:\Users\Dani\AppData\Roaming\IObit\DriveDetection.ini


rubah angka deteksi drivenya jadi 1. Contoh:

[DriveType]

C=1

D=1


Thursday, September 15, 2022

Cara install font ttf di ubuntu

 copy file ttf di direktori:
/usr/local/share/fonts

atau
/usr/share/fonts

jalankan:

fc-cache -f -v


cek dengan
fc-list | grep "<name-of-font>"